 If you have ever hosted, or purchased, jewelry from one of those in-home party companies, you may have several cardboard jewelry boxes that have sliding sleeves. If you do, find a really good glue (I used E-6000 liquid glue/cement - fount at Michaels - this stuff glues wood, metal, and you're paper or cardboard is not going anywhere!) - and sandwich the boxes together.
Create a You’ve Got style Trinket Chest
Using BoBunny's new Petal Pushers line - I covered the boxes with patterned paper. As it turns out - a strip of 12" paper, cut 3 5/8" wide, fit EXACTLY around the sides and top of the boxes - how convenient! I used Doodles for the sides, and Whoosh! for the drawer fronts and backs, and also for the border strip along the bottom.
Now, I will share some close ups and tips so that you can make your own dresser-top set of drawers....
First, to create the drawer pulls, I dove into my "many many buttons" container and fished out multiple plain white buttons - unless I paint these or do something to make them more interesting...these just sit there. I decided to sandwich two together with KI Gloo and allowed them to dry. I then flossed three colorful, larger buttons found in the Petal Pushers and Sunkissed Buttons and Bling collections. Because of the floss, I wanted to ensure they would adhere strongly to the white buttons, and used the E-6000 cement again...and again to secure the 3-button sandwich, aka drawer pulls, to the center of each drawer.
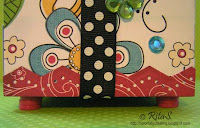
I repeated the button sandwiching idea to create the legs for this project. It just looks a little nicer setting off the dresser top, don't you think? I have no idea where they came from, but I have a collection of about 30 bright pink buttons that all look alike and are the same size. They were perfect for the legs. It would be best to let your glue or liquid cement dry thoroughly in between layers. You may notice one set of stacked buttons has one slightly askew, as I was rushing the process so we could leave for vacation. A perfect stack is not critical, however, as long as each stack is the same height.
I wrapped the entire "paper chest" with black licorice double dot ribbon - I love the contrast with Petal Pushers. Using Flowers from the same line, I dabbed sparkle Mod Podge on the petals...one can never have too much bling, IMO, and especially on a fun girly-girl project like this one! (oh, and feel free to dab your buttons with Sparkle Mod Podge as well!) I love using the circle patterned side of the Whoosh! paper to punch out butterflies - making the sure the design is symetrical on each wing - very cool design and the paper did all the work!
I wanted the butterfly to hover over the flower. To do this I took a white piece of craft wire about 3.5" long, wrapped one end around the button in the center of the flower, and using a white, foam adhesive dot, attached the butterfly to the wire. I hope the close up photo helps you see how I did this. To finish embellishing the box I adhered additional buttons and bling here and there along the sides and top of the chest of drawers. Less than 6 months to Christmas, right? Checking one gift off my list... and I am certain she does not read this blog. (LOL)
I happend to buy a necklace for a teen a few months ago...so I am thinking a few chocolates in one drawer, perhaps a gift card in drawer number two, and the necklace in drawer number three - what could be more fun than to receive this fun and funky floral trinket box with a few trinkets inside?!
To recreate this project I used the following supplies:
BoBunny Petal Pushers: Whoosh and Doodles Patterned Papers, It’s A Girl Thing Cardstock Stickers, Buttons and Bling, Flowers, iCandy Brads
Sophie iCandy Jewels, Sunkissed Buttons & Bling
Licorice Double Dot Ribbon
Other:
DMC Floss
Sparkle Mod Podge
Black Pearl Gems by Mark Richards
Colorbox Chalk Ink-Black
Misc: Buttons
Adhesives: Mod Podge, KI Gloo, E-6000 Industrial Strength Clear Craft Adhesive
Let me know if you find some boxes and recreate this project on your own - I would love a link to see it when done! Happy creating!
Rita S.


2 comments:
Rita I saw this project on Bo Bunny´s blog and I´m in love....anda now I´m following you.... thanks for sharing.
Hugs from Brazil
That is so beautiful
Post a Comment