Sunday, August 22, 2010

Round 2 - Shop Eyeglasses w/ Me!

Thanks for everyone's input so far ....I really never thought about glasses being too wide for my face until most of you mentioned it. Honestly have never ever used the word "thin" to describe my face personally - I have chubby cheeks - the two don't jive! (LOL)
OK - I feel brave for posting this little side profile...really makes my Italian nose stand OUT. Just wanted to show you the cool side scroll work on the #12 pair of glasses.
Below is another round of photos, of which I will start out with #6 -which won round #1 and was my favorite as well. Six more pair added -these shots taken at Shopko and Eyemart Express.

Following pairs found at Shopko - which had a good selection.

Geoffrey Beane

Geoffrey Beane 2 (rhinestones on the sides)

Sorry -another 8. Plz refer to as "8 Liz"

Some of you preferred the pair in round one with no frame at bottom.


Last two below are at Eyemart Express.


Thanks for coming along with my on my eyewear shopping excursion. It is always so nice to have the help of friends when making such a decision. These frames will have to last me, at minimum, two years. Which means the style needs to last that long...if only one could forecast future trends. Please comment below with your vote. I apologize for having two #8s, but I am out of time to open all my photos and re-edit in PS again.

Friday, August 20, 2010

Want to help me choose glasses?

I've put this off too long.  I have been using reader glasses, although my prescription calls for lenses of different magnifcations for each eye. I had a chance today to check out frame availability of some of the providers our insurance covers. Turns out, our insurance is pretty decent for frames. But not for lenses - we won't be renewing our vision insurance end of year! Only the cheap plastic lenses are covered, and I definitely want the hi-index lenses. Which basically means the cost of lenses are out of pocket. When comparing costs/add ons with the providers, wouldn't you know the non-provider Costco costs is going to end up being less. Fortunately, I found a number of eyeglass styles to consider at Costco. I have always wanted red frames, but not too red. Below are 6 choices, one of which is silver.  I thought I would have you help me decide which pair from Costco looks best (I will choose top 2) and then compare to what I found elsewhere today.
Below are the photos - I won't say much as I don't want to sway you -but each pair is numbered. Let me know which you like best. Pardon that I am not smiling more - not sure why I look so serious. Although it must have looked strange taking your own picture at all the eyewear places today!
Thanks in advance for helping me decide!


Please leave a comment below and let me know which between #1 through #6 you like best. Thanks!

Friday, August 13, 2010

BoBunny August Sketch Challenge

Every month BoBunny provides a sketch, and issues a challenge to go along with. I must say I have loved creating the sketches, and hope that you have enjoyed them over the past year. I am sure BoBunny will continue to provide you with great sketches for monthly inspiration.
I know that we have scrapbookers who love one page layouts, and those who love two. I promise, that later this month the BoBunny team will be sharing more two page layouts for inspiration, but for the sketch, I created a one pager.
BUT - not to fret! If you love 2 page layout sketches I took this one, and changed it up a bit to design a two page sketch as well. You can find it at the bottom of this post.
Be sure to hop over to BoBunny's blog to see how other design team members interpreted the sketch.


I fell in love with the Roughin' It collection the first time I saw it, even though we do not camp! BoBunny designers were ingenious when creating this line, because although one side is geared towards camping - the backsides offer patterns such as woodgrain, camoflage, and non-theme patterns in wonderful earthy and primary colors. Roughin' It is perfect for layouts about people who woodwork or do carpentry, hike, birdwatch, fish, participate in military re-enactments, and even fall layouts with the leaf patterned paper.
Ideas to Note:
1. Split a cut out into two parts, and use it separate places on a layout. In this layout, a yellow cut out was pieced above and below the camoflage circle.
2. Mount letter stickers on patterned paper and cut out and around -which sets the title off from the layout well, especially when lifted off with dimensional foam adhesive.
3. Use cardstock sticker photo corners as embellishments. In this layout they draw attention towards the two smaller photos.

Supplies Used:
BoBunny Roughin’ It Collection
Papers: Nature, Leaves, Dots, Way to Go Diecut, Roadsigns, CutOuts, Combo Stickers, iCandy Chipboard Stickers, iCandy Brads, Catching Memories Cardstock Stickers, On With Nature Rub-on, Buttons and Bling
Other:
BoBunny Blueberry Double Dot Ribbon
BoBunny Bodacious Brads
Colorbox Chalk Inks
Brown Jute
Font: Birch Std.


Above is the same sketch altered for all of you two pager memory artists. Oh, and I was surprised to see my two page layout for the August DT assignment shown on BoBunny's blog yesterday for the "summer fun" post. I quickly posted my two pager here, called Mireya, so you can scroll down a bit for yet another two page layout idea.

Congratulations to the newly announced members of the BoBunny design team for the upcoming year! I am thrilled to see so many talented friends on the list. My life has taken a new turn as an Independent Arbonne Consultant. I recently resigned from the Magistical Memories team, as difficult as it was to do, and will not be continuing on with BoBunny. My focus for the coming year is going to be on growing my new business, and pursue my goal of making lives healthier for the people I know and love, and changing the life of my own family with a growing income that will help us afford things that we have always wanted to do. I believe in the products and believe in myself to make a difference with Arbonne.

I will still bring you projects on my blog. You would not believe the LONG LIST I have of mini album ideas, layouts and projects...my own version of a scrapbooking bucket list. Now that I will be creating at my leisure, I will be able to complete many of these projects at last, and look forward to sharing them with you.

Happy creating!
Rita S.

Thursday, August 12, 2010

Celebrating Friendship with BoBunny's Peacock Lane

The happy colors of BoBunny's Peacock Lane went along perfectly with these photos of our daughter and one of her best friends.  The photos are from kindergarten. Seeing them, and scrapping them, made me smile.
I remember this little photo shoot like it was yesterday. I had the girls sit on the deck so I could take their photo together, and of course Mireya, not being deluged with a camera-wielding-mother day after day, happily obliged and smiled for me.  Out of the blue Abby started singing a song she had learned at church, "Awesome God".  I am not sure what started tickling Mireya's funny bone, the fact that Abby started singing, that she was singing about God, or a bit of both - but the results are some fun photos. And Abby, bless her heart, kept on singing her song and smiling until she was done.


This layout was a part of the weekend challenges at A Cherry On Top...and the toughest challenge, I might add.  We were given choices to select on how we prefer our salad. I opted for quite a few add ins, as I like lots of vegis in my salad, and I knew I might pay for all of the choices later on. When the challenge was posted my salad recipe included: Patterned paper only, 5 photos, flowers, chipboard, felt, bling, glitter, brads, tag, something green.

Getting started was difficult as I couldn't reach for the BoBunny Dot cardstock for my background.  I went into my old paper stash...and started leafing through the holder marked "purple" and found some watercolor type wash papers that would work well for my background. From there on out it was play time with Peacock Lane. I love the colors in this line and the fun complimented the girls shirts really well. I cut up a sticker from the collection and utilized a part of it as my lead in for the title, "the little things"..."about" (which I made myself)...."Mireya" - which are combo stickers, of course.
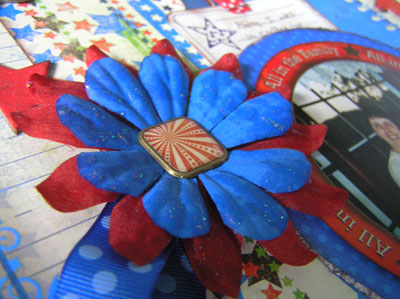
I love so many of the Peacock Lane papers and had quite a few scraps. I opted to make easy, layered lollipop flowers for the layout, so I could incorporate felt in the form of hand-cut leaves.  I used several colors of Stickles on the circle shapes, and also used the Lime Green on the leaves.
Although my papers included green, when I was about done I decided I still needed something above the smaller photos on page 1, and opted for a Magistical Memories decorative shape, which I painted green and topped with Lime Green Stickles. I needed a really large brad for the center, and since I don't have the iCandy Brads from Peacock Lane, I rummaged and found some from My Mind's Eye that coordinated very well.

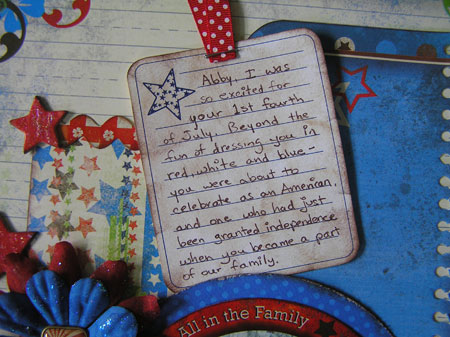
The Noteworthy pack offered the perfect piece on which to write the journaling, which was a short list including several things about Mireya.
Journaling:
1. Mireya was your best friend in kindergarten.
2. Her family speaks only Spanish so we have friends translate notes for play dates.
3. She giggled and laughed when you started singing “Awesome God”, out of the blue, when mom took these pictures – you kept singing.
4. You missed her terribly when her family moved away, and you prayed for her every night.
5. You were so excited when her family returned early and you had your best friend back for recess.

Supplies:
Peacock Lane Papers: Flowers, Dot, Vine, Parade, Plumes, Tweet; Noteworthy, Combo Stickers, Simply Wonderful and Perfect Day Cardstock Stickers
Violet Dot cardstock
Other PP: Making Memories Purple Simple Sponge
Chipboard: Magistical Memories
Bling: Clusters by Mark Richards
Glitter: Stickles Lime Green and Crystal, and Ice Stickles Mint Ice by Ranger
Brads: Lush by My Mind’s Eye, Making Memories
Paint: Apple Barrel Kiwi by Plaid Entr.
Ink: colorbox Chalk Inks
Misc. Craft Felt

I hope you have enjoyed this two-pager, and next time you list off your ingredients for tossed salad, think twice! (LOL)

Happy creating,
Rita S.

Wednesday, August 11, 2010

Paper Piecing after Midnight? Crazy!!!


Crop challenges are addicting, don't you think? All sanity disappears.  It is late. In fact, there have been several nights in a row scrapping into the early morning hours. On the weekend, not so bad. On a weeknight, not good. But I confess, on Monday, August 9 I began scrapping at sundown and kept on going until after 2 a.m.  I was like the Energizer Bunny -and could not stop!
I am not sure what to think of my ideas that time of day. The challenge: scrap photos at least 5 yrs old and have a visible date on the page.  Ok, found these two cute photos of Abby, obviously from years ago. The obvious papers to use, of course ... BoBunny Sunkissed collection! As I rummaged through my Sunkissed line, I came across a partial circle scrap. Hmmm, what to do with this... I really liked the sunburst coming over the fun green hill...what could I do?  Well, I got to thinking about my quilting days...landscape quilts, to be exact. Perhaps I should back up a bit...
The story behind the photos.... "she was afraid to go into the water." (Sung to the tune of "itsy bitsy teeny weeny yellow polka dot bikini".)  Even as a tot Abby could be stubborn when her mind was made up. It was our first visit with her to our friends lake house for the weekend and she would have NOTHING to do with going in the water. All she wanted to do was sit on the comfortable blow up raft, sip juice and munch cheese nips under the umbrella.  The story led me to my idea....I did not want to use the paper that looks like water waves...because, after all, she did not get her feet wet. I wanted a grassy green base to my layout...that is where she stayed. The sun was out and bright skies were over head...my goal was to recreate the day in a "landscape" scrapbook page.
With partial circle in hand, I was inspired to stretch out the color scheme using matching BoBunny Dot Cardstock in Kiwi, Lemon, and Ocean.  There were several challenges to overcome, which I won't discuss, but  has everything to do with me hording Dot cardstock and not wanting to build upon it and have a large portion be covered up.
Once I had pieced my landscape, I plopped my little girl down in the grass. I had cut out my journaling cloud and written out the story earlier in the night (thank goodness!) - and positioned it to balance out the photos. With eyes barely open (mind you, it is almost 2 a.m. at this point), I glanced at the Sunkissed cardstock stickers, chipboard sheet and placed them on the layout without too much thought. It almost seemed random. I discovered the design on the blue strip at the top of the page was not a part of the patterned paper, but a cardstock sticker that must have positioned itself to my scrap circle piece during the last project from which the circle came. Darn! Of course to remove it would tear the paper, so I left it. Element by default. In the back of the Noteworthy packets BoBunny has provided additional designs for you to use in your creativity. I cut out one of these designs as a base for my date block. When all was done, I decided the sky needed some clouds. I have to admit I am so in love with the Skies paper in Sunkissed...I never thought I would be one to sprinkle clouds on my layouts...but I am doing it every time I scrap with this line, it seems! (LOL)

I wrapped up "Just Chillin" before the clock struck 2:30 a.m. I added a little Stickles to a few chipboard pieces for bling, which Abby loves, and headed to bed.  A day later, I look at this layout, my pieced work, and am unsure about my idea...although the ACOT gals tell me they love it. Perhaps this layout is "out of my box" with the smattering of elements in the bottom section...but oh well, I will not do any of it over, and consider it another challenge done. I think if I chill long enough and catch up on sleep, "Just Chillin" will grow on me.  Thanks for coming by!
Happy creating,
Rita S.

Tuesday, August 10, 2010

What are you wired for? BoBunny Roughin' It!

In the past week I have made three layouts using BoBunny's Roughin It collection - do you have it yet? I hope so! With everyone returning from summer camping trips it is bound to disappear quickly from store shelves. But did you know...that even if you do not camp, Roughin' It offers so much more than product for camping layouts. I will share a few ideas with you today and tomorrow...with today being a faith based layout and tomorrow's being a girly girl layout. Hopefully you will be wired to think outside the "campy" box when using this collection.
Re-Wired is one of my very last efforts in meeting the ACOT weekend crop challenges. For this challenge, instructions were to visit the last page of your on line gallery, and scraplift yourself. I did so. My gallery included a number of digitial layouts, cards, and not even a handful of traditional. It was obviously an upload day for the digital creative team I was on, and each had large, oversized photos.  One thing I noted in a couple of my traditional layouts was a chipboard circle frame encircling the focal point photo. It is a technique I like to use when wanting to draw attention to the subject matter in a photo.
I chose BoBunny's Chunky Chip circle frame in chiffon, and gave it a generous coat of Tim Holtz distress crackle paint in corduroy. Once dry I skimmed over the top with linen and walnut distress ink pads, and used a cotton swab to rub the ink into the cracks of the frame. The result, I think, is a nice faux woodgrain, and it was the look I had wanted for this woodsy layout.
Now, mind you, I was creating this layout, starting it well after midnight. Crazy to even do so....but I was really psyched up to get the challenges done. I found a photo that worked well for my scraplift, and it was pretty obvious to me that BoBunny's Roughin It would be the perfect choice. With a wonderful choice of coordinating papers and embellishments before me, I was able to bring this layout together in a short amount of time.  A tip in creating the journaling block - I placed an oval shape over my text box where the dimensional cardstock stickers would go, and tested it a few times until my text would "run around" the "row of trees" shape.
The journaling itself is inspired by a message series we are currently hearing at Blackhawk Church. The core of the message is that we, as humans, are wired to be in relationship with, and communicate, with one another.  When my family is out for a walk in the woods we are reconnecting our wires as  a family - the distractions of television, computers and phones are left behind. I encourage all of my readers, if you scrapbook, to scrap a page about an activity that brings you closer together as a family. Hey, maybe it is camping! In which case BoBunny Roughin' It is PERFECT!

Happy creating,
Rita S.

Monday, August 9, 2010

Block Party Brings Life to Old Photo


Even though the ACOT crop ended Sunday, we have 'til Tuesday midnight to upload our projects. I wanted to share a favorite that I cropped this past weekend, which utilizes BoBunny Block Party. I have had a 4x6 photo of Abby and myself on her very first 4th of July, but it wasn't photographed closely cropped, and there was a lot of distraction to either side of us. When I spotted the "All in the Family" circle frame in the Block Party cardstock sticker collection, I knew that I had just found my rescue. In fact, it turned out even better than I envisioned, matted on Blueberry Dot cardstock.
I remember that July 4th pretty well. I was excited to be dressing our new daughter in red, white and blue. I was very aware that she, as a new citizen, would be receiving freedoms and opportunities here in the U.S. that she may not have had in her home country of South Korea. It was a memorable day, and although we watched fireworks from indoors, looking out that large window behind us, it was a day to celebrate independence.
This layout was created for the "number challenge" - the idea to have a number promiment on the page. I did that by covering a chipboard 1 with paper from Block Party. I used combo sticker alphas from BoBunny's Tis the Season collection, and used combo sticker letters from Block Party for the "fourth). I love BoBunny's Save the Date acrylic Stamp n Store set. If you do not have this collection (2 cases to the set) be sure to look for it, as I find I am using it often and in different ways. Here it is an element directly on my background page, stamped with the year and date circled.
I hope you have enjoyed this peek at one of me weekend crop layouts. I have lots more to share. I must say how blessed I am to have been given so much BoBunny product as a member of the team. Creating quick layouts for crops, including fast scrap challenges, was a breeze with all of the coordinating product. I have enjoyed this year immensely. Friday is coming...try to be patient, although it is hard. I am going to stay busy, scrapping as much as possible, to keep my mind off the looming announcement. Scrap therapy!!

Happy creating,
Rita S.

Saturday, August 7, 2010

ACOT Crop - BoB rescues!!


This weekend is the big crop at ACOT, and I was up until 2 am scrapping! I am so blessed to have collections of BoBunny - all I need at my fingertips. I managed 4 layouts last night - not bad. The above was a 6, 7,8 challenge. I used 6 buttons, 7 corrugated letters (I love these!), and 8 punched circles.
I will share one more, and then we are off to a family gathering for today, and after that we head to friends for the annual sweet corn harvest celebration, which is where photos for the layout, Ride, were taken below. This was created for the scrapliflt a CT member challenge, and I lifted the super talented Juliana Michael's and her layout,  "Let's Ride".  Have a great Saturday!

Thursday, August 5, 2010

Bloomin' with BoBunny Petal Pushers


I've always loved the phrase "Bloom where God plants you."  How many of us are planted exactly where we thought we would be all our lives? 
Life happens to all of us, and although it may not turn out exactly as we had hoped, we need to remember that God is in control. No matter where we are planted, we should strive to bloom, with nurturing from our heavenly Father. BoBunny's Petal Pushers line was a perfect choice for this card. A chipboard flower nestled among some ribbon-y grasses is blooming right where it was planted. The bee is symbolic of the flower producing good fruit, or nectar, which is what God asks all of us to do.

I want to share with you, an up close image of the ribbon work. What For this piece I used 5/8" BoBunny Double Dot ribbon, and fold it "not quite" in half. The ribbon fold is offset so one half is a wee bit longer than the other. I then stitched the ribbon along the seam of my black paper border, close to the edge. The result is a little ruffle effect. I should mention that the little stripe border is simply created by folding over the paper edge of the black  strip - and stitched as well. It is a simple finish to the top, and quite attractive, thanks to BoBunny's two-sided patterned paper design.
I know we all have lots of flowers in our scrapbooking stash. For someone who has just graduated, moved, landed a new job, is heading off on a mission trip - this card is sure to encourage them as they "bloom where God plants them". 

Happy creating,
Rita S.