
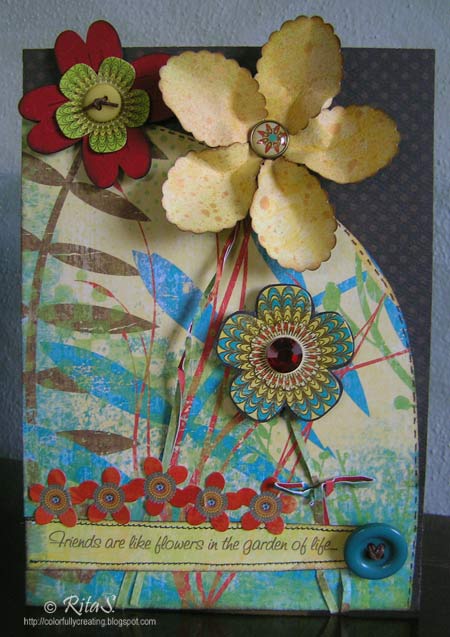

For added interest I free-hand cut a curve to the Free Bird paper and adhered to 5x7 Chocolate Dot cardstock.
Making use of the stem designs in the Free Bird pattern paper, I topped them with flowers.

Skinny strips of Flower Child papers were twisted together, and secured at the top of the Free Bird paper (note that the paper flower covers the ends of the strips), and secured near the bottom, underneath the sentiment strip. The strips play upon the design already present in the Free Bird paper. The same technique was used for the sticker flower on the right, which also uses skinny strips to create leaves by folding and tying into a bow.

 Adjust position of flower petals as needed, and once happy with the arrangement, press iCandy brad through hole in chipboard flower shape, with the brad catching and securing all the petal shapes as it is feed through the hole. Set flower aside.
Print sentiment onto the yellow side of Love Beads paper. The strip on the front reads: "Flowers are like flowers in the garden of life...". The inside sentiment is set up to be punched in a circle shape, and was inspired by the friendships in my life, as well as the garden theme, reading: "Each one unique. Each one brings a smile. Each one is loved. Together growing. Together blooming. Together forever." Print out the words, and cut into the shapes shown - strip for front, circle for card inside.

For the inside, cut a larger circle from the center of Aquarius paper (this allows the paper to be build upon later as a new layout, covering the cut out circle area with a photo and/orother papers). Mount yellow circle, with sentiment, to turquoise circle, stitching around edge if desired, to yellow dot cardsotck. Add rub-ons as shown.
I apologize to those that came by earlier today. I thought I had this particular post scheduled to go live this morning, but alas.... I come home from work to discover it had not. I try to find time to verify a post has done as it should on a launch day, but with the 16 chicks in our house to take care of before leaving for work this morning...well, unless you've been there, you can't imagine! (LOL)
Happy creating! Enjoy BoBunny's Flower Child line, it is gorgeous and fun!
Rita S.


3 comments:
You have created some great projects with this line Rita! I love that flower...will have to give that a try soon!!!
Saw a peek during the blog hop. HAD to come and comment on this BEAUTIFUL card!
beeeutiful
Post a Comment