Monday, November 30, 2009

Little Santa Man


Just wanted to share some photos I took Sunday of our godson, Jed. He was visiting with his mom over Thanksgiving, from Pennsylvania. Of course I cannot wait to scrap some of these photos. It will be hard to choose!

I love how the look of innocence and wonder was captured in this photo.


And here we have the sparkle in his eye.


This one has the very typical "Jed grin" - this baby is almost always laughing and smiling unless he needs a diaper change, is tired, or hungry.


For the sake of playing in Photoshop, I decided to tone down the colors (desaturation) to create a more vintage look.

Just a sampling - more photos can be found in a new share folder I just created at Shutterfly.

As we begin the month of December don't forget to get out your camera and capture all those moments before Christmas. Especially family time decorating the tree, baking, and other holiday traditions.

Monday, November 23, 2009

BoB Snowy Serenade Ornament


Welcome! Are you tired from shopping? I am thankful that our local variety store restocked the Schleich medieval figurines Kyle wants for Xmas and was able to get almost all he wanted before starting work across the parking lot at 8. (LOL)

If you are wore out, relax and hop the blogs! If you have hopped from the BoBunny blog I am happy to share the instructions for my newest BoBunny Christmas ornament.

Ideas to Note:
• Subtle border edger changes up a traditional paper crafted ornament.
• Use mod podge to create two sided glitter paper.
• Metallic thread adds even more sparkle.
• Center hanging snowflake medallion, totally “blinged”, will catch the lights of the Christmas tree.

How To:
1. Use mod podge adhesive to created two sided paper design using Snow Serenade Stripe and Sparkle
2. Cut into 1.125” strips and use wavy border punch; tip: line up one edge flush with edge of punch, punch, pull out and FLIP over, aligning edge with same end of punch. Then continue punching the border design down both sides. This will ensure a mirrored image for the paper strips.

3. Five strips total were used in the ornament example show. Fewer may be used.
4. If stitching strips, back stitch about ¼” before end to secure. Hole punch ends, avoiding the thread.

5. Use pencil to mark the center of each strip and punch hole for brad, OR use craft knife to create a slit parallel to the stitched line. The latter avoids punching through the stitching and creating an open thread end. Although a bit more work when sewing, once can mark the center point on each strip and backstitch before and after to keep thread secure when punching through.
6. Use purple brad to secure strips together as shown.

7. Without center medallion use brad to secure all strips at the top, and use filament or other to wrap around base of brad and create hanger.


Center Medallion option:
If desired, add a hanging design in center of the ornament. For this project a chipboard shape was colorized with paint, embossing powder, and glitter medium, and BoBunny stickers (also coated with glitter medium) were layered on top. Gems were secured in the center. Note that both sides of the snowflake are finished so it always looks good on the tree, no matter which angle it is seen.]

I used a colored embossing pen under an opaque powder - which allows a little glimpse of blue, and ties in nicely with the paper colors.

To add a center medallion, skip step 7 and pick up here.
8. Using fine thread, about 9” long, guide both ends through top of snowflake and then through all the holes of the strips, bringing each end up one at a time. TIP: wrap small piece of magic tape around ends of thread, roll tightly, to create any easy end to thread through successive holes. Gently pull string upward as each paper strip end is threaded onto brad. (NOTE: this can be a bit tricky to get all the strips onto the brad, take your time.)
9. Once all are in place, pull thread upward so snowflake hangs in desired position, and secure brad into place. Enjoy!


Tip: bend up the stickers a bit to add some dimension.

BoBunny Supplies Used:
Snow Serenade Stripe, Sparkles, iCandy Brads, Combo Stickers, Buttons and Bling
Other:
Magistical Memories Chipboard Shape
Paint: Liquitex
Embossing Powder: Stampendous Detail White
Stickles by Ranger, Stardust
EK Success border punch: Dotted Wave
Thread: Coats & Clark (wisteria) and Sulky (metallic monofilament), and Gutermann (silver metallic)
Adhesives: Mod Podge

I hope you are inspired to get out your paper crafting ornaments and make an ornament this holiday season. This one in particular is easy for the children to get involved with (if you skip the center hanging medallion) - you don't need to use border punches to create a pretty ornament. My daughter was given strips to play with and she has made some of her own. If you did not come here via the BoBunny blog I just want to thank you for visiting my blog of your own accord...or by a google search... I do peek at where people are coming from and how they found me and I am always curious as to how some google searches can lead people here...willing to bet they may not even scrapbook! (LOL) I especially want to shout HI to my fellow Cherries from ACOT - I see a number of you popping over and I really appreciate your taking time to do that. As always, happy creating!

Sunday, November 22, 2009

Newsong Giveaway

How about a music giveaway on my scrappy blog?

We adopted Abby through Lifelink, which had a local office, but we still receive mailings from Holt International. Holt has placed babies with adoptive families for generations. Newsong, one of my favorite music groups, partners with Holt to raise adoption awareness and needs of orphans.

I received an email today about this free download, and thought I would share it with you all. Like Holt, I hope you are inspired to make a donation to children in need. Doesn't have to be Holt. I also have links in my sidebar for an orphanage in Malawi, Africa that our family has ties with, and when able we are blessed to help support orphans in Haiti as my sister and her family travel there annually.

Music really speaks to my heart, and I tend to get quite emotional. If we all agreed to listen at the same time, I bet we would all be sniffling at the same time as well! Downloading mine now, haven't heard the songs...but it goes without saying that they will make me bawl.

To get a free copy of "Give Yourself Away: visit Holt.

Poor Man's Studio Accomplishments

A few have asked how I accomplished my lighting for the photos I shared yesterday. First, absolutely nothing fancy - a true poor man's studio. I did use some newly learned knowledge about key, fill and rim lighting - acquired at last weeks photography group (BAG) through our church. We are so blessed to have professionals willing to spend time to put workshops together, and teach us for free on how to obtain better quality photos!

The room setting:
Refinished basement at our neighbors home. The idea was to use an antique, refinished workbench containing all kinds of knicks and cuts from years of use. I was looking for a rustic surface to photograph some of Marv's belongings on.

The lights:
Typical can lights in the ceiling - which we believe are incandescent. Above the workbench were two sets of tracks about 24" wide with three small lights - appeared to be "art lights" with a daylight cast. These were aimed at two paintings on the wall, which we removed, and used clothespins to secure a backdrop cloth to the nails.

I am pretty sure I took this photo with my Nikon D80 on full automatic - no flash. Very dark. I switched to manual and metered my camera to zero.

It was obvious I would need a KEY light. I used a clamp light that has a 60 watt equivalent full spectrum bulb. There was nothing to clamp it to, and pretty much I set my light down on the far end of the work bench to my right. I was worried about using a daylight bulb, since I wanted a warm glow for some of my shots, but things worked out as I wanted. I believe I metered up once or twice, and left it at that setting for the rest of the shoot, once my lights were established.

I should mention I shot my photos at aperature priorty, with a mix of manual and autofocus. I also did not change my white balance and left it on the default: incadescent. I wanted a warm look to my photos - and the sample shots I took were pleasant, so I saw no need to change the white balance.

Too much shadow on the left, so a fill light was added. Of course I forgot the floor lamp at home that I intended to use, with a daylight bulb to match my key light. I was taught at the workshop that all your lights should match. We ended up using a table lamp on hand, removed the shade, and it had a compact flourescent, which seemed to give a blue cast, definitely not yellow. Carefully we tipped it on its side, propped where needed so it would not roll off, and aimed as desired.


I was so glad for my friend, Deb, and her help. Truly, one cannot do such shoots without an assistant. I used my car windshield reflector as a reflector in front of my key light - the idea was to bounch some light back towards the light and reduce glare on my photos.

The final result. I love this photo collage, which is very true to color do to the added in lighting.

I have to say how blessed I am to have an elderly friend who has collected antiques for years. She loaned me marbles, depression era, an old tin horse and sheep, and small, red leather kid boots - one could not ask for any better props than these!

Switch around...when we changed our backdrop and table to the burlap - the lighting changed. The casting of the light became yellow - because of the material. Seriously, we did not change any of our lighting. It WAS the look I had envisioned for these photos - got to give God praise for that! This photo below captures the true "essence of Marv".

I did move my fill light towards the back of the table to change my shadows a bit, at which it is then referred to as a rim light.
I don't know if this information is of any help to you or not, but for those of you who asked...this is how I accomplished my Saturday photo shoot.

Saturday, November 21, 2009

Essence of Marv


That is what I am calling today's photo shoot. I attempted to capture a bit of who Marv is as a man though some of his belonging. Mainly, his bible, a cross, worn straw hat, and a trowel "distressed" with dry cement - Marv spent 30 years of his life as a "concrete man".

I look forward to going through all the photos. AND I called on my new knowledge of poor man's studio lighting - thanks to the BAG photography group at Blackhawk. These pictures are unadjusted - set up a little auxilliary lighting and it can save hours at the computer editing!

I plan to use a number of the photos in a remembrance album I am hoping to finish by Christmas. I couldn't do a thing, however, without these photos. I would love to hear what you think of these few shown here today. Especially your feedback on the cropping of the last photo, please.

The photo collage below showcases the only available photograph of Marv as a boy. I love the the horse in the photo, as I just recently learned that Marv rode a blind horse named Danny when he was a child. I sure wish there had been a photo of Marv and his horse!


I think this may be Marv holding his firstborn. I will have to ask. Here it is raw.

In this photo I cropped it and took out some of the small leather kid boots. Which do you like better from an esthetic viewpoint.


I have 300 photos to go through from today. Many duplicates - I shoot, move the camera bit - the slightest angle change can catch a small detail missed in the previous. Not all are Marv related, as I have some new BoBunny projects I needed to shoot as well. On Monday you can come back for a "how to" on a new Christmas ornament being showcased on the BoBunny blog. Would love to have you visit again. Happy creating!

Thursday, November 19, 2009

Christmas Giving: Special Album for Mom


Celebrate Mom this Christmas, and the memories you share, with a fun thank you in the shape of a purse! Filled with a variety of “purse pockets” containing love in the form of memory slips, this project relives moments through the years. Sibling input makes it extra special. Let the pockets and items mom carries in her purse be your inspiration!


Everyone has some sparkle glue sitting around, right? Grab your Stickles, or your kids glitter glue, and add some bling to your flowers. It's easy, and it is something you can do just before you have to leave your project to go take care of something else around the house, or go to bed.;-)


To get started in making this project - trace the shape of the album onto your patterned paper and cut out. Plan your pockets, cutting out and using paper clips to hold shapes in place while sewing or adhering to your page. Note: all sewing for this project was done prior to adhering the pages to the chipboard album itself.

Big Idea: Photograph items that would typically be found in a purse. Retain the shadows when cutting out so that the images appear dimensional in your project.
The cell phone is kept in the pocket with velcro. On the backside of the phone I journaled about phone etiquette that we learned from mom. For example, never call your mother during the middle of a Packer game. (LOL)

By the way - anyone besides me remember those black combs? Small and an easy carry in a purse - mom would sometimes whip that baby out before the boys set foot inside of church.

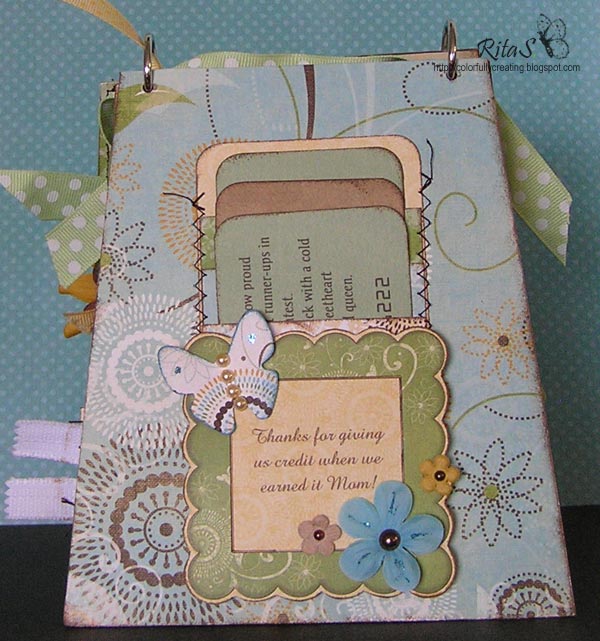
A page in "honor of the plastic" - we'd be no where without our credit cards, and every purse seems to have credit cards.


If creating credit card pockets and faux credit cards – use an OCR font to mimic real numbers on the “cards”.


To add in the zipper I fell back on my years of former sewing experience. I started with two strips of paper approximately 2" x5", and folded 1/2" under along a long edge. With paper strips upside down, folded edges side by side and in the center, I positioned the zipper and held it in place with paper clips before sewing. The zipper used was too long, and I snipped it off to the desired length, backstitching across the bottom to create a "stop" for the zipper pull.


This fun little pocket shares quite a few memories of times in the kitchen with mom, and reminiscing about favorite, and not so favorite, recipes. For example, my sisters and I were always sneaking the liver out to the cats in the barn when mom wasn't looking. We dreaded dinner time when mom pulled liver out of the freezer! My mother never used a recipe, and although I will use one, I have picked up on her tendencies to add a little bit of this and that.

Because my siblings and I all have memories of mom’s infamous “onion lines” – I took a photo of onions. Tip: Use matching paper from your project as a backdrop in the photo shoot.

Finish with a pocket full of memories – random memories that do not fit into any other category.


The flap shape was cut from the grid paper, and stitched around the outside edges.

To make sure there was give in the pockets bits of tissue paper was crumpled and stuffed inside, holding paper in place with paper clips while stitching into place. This makes it easier to pull out the memory slips tucked inside pockets.

Supplies used:
BoBunny Flutter Butter Papers: Breeze, Burst, Honey, Willow, Flutter Butter, Stripe, Combo Stickers; Thankful Cardstock Stickers
BoBunny Butterfly Dreams iCandy jewels, Flutter Butter Buttons and bling, Flutter Butter Flowers, Double Dot Clover Brads, Double Dot Mint Green Ribbon 5/8”, Double Dot Mellow Yellow 3/8”, Double Dot Cardstock in Sweet Pear, Clover, Decaf, Frost; Chunky Chips alpha in Clover (painted)
Acrylic Stamps: BoBunny Stamp and Store Write On!
Other:
Magistical Memories Purse shape mini album (no longer available from MM, but BoBunny offers a cute 6x9 Purse shaped board book – adding a flap of your own gives room to be creative! In fact, use a BoBunny shape from the Clearly Creative Serendipity album would add real pizzaz!!)
Chipboard scallop plate by Maya Road
Pearl Stickers: Kaiser Crafts and Bazzill
Glitter Medium: Ranger Stickles
Zipper – Talon
Ribbon: Offray (solid yellow), green puff ball (May Arts)
Flowers: Prima Ltd.
Paint: Folk Art, Liquitex
Inks: Staz On by Tsukineko, Colorbox Fluid Chalk Inks
Thread: Coats and Clark
O-Rings: Quill
Pen: Zig Memory Writer, Sharpie
Adhesive: ATG, 3D foam by EK Success
Fonts: OCR, Amaze (downloaded from the internet)

Include a pocket on the back side of the “purse” to offer a gift card.


I hope you have enjoyed this idea - if you decide to create a mini purse album of your own someday, pop back over here and please share your image link. I would love to see them. In the meantime, happy creating!

Friday, November 13, 2009

Distressed Look With BoBunny Gypsy


I had a lot of fun playing with BoBunny's Gypsy (again - it is always fun!), and got a little messy on my cardstock with this layout. It seemed once I had out the paints and inks I couldn't stop myself from putting a little here and there.

A Tip for Your Flourish Stamps
Create borders around layout edges by mixing up flourish stamps and several ink shades. Use scrap paper to mask as needed. BoBunny Stamp & Store Journal corner border design was used, applying Red Brick ink to flourish section of stamp design only. Smaller flourishes in the set were used to add brown and Prussian Blue.

Versatile Chiffon Chipboard
The cream colored alphabets and shapes, known as Chiffon, by BoBunny are extremely easy to color. Using a drybrush method and going light on coverage, the natural color beneath comes through for a great white washed look. This was the intial look of my letters, but I had other paints and mediums on my table and I couldn't stop playing. On top of my initial color I used chalk ink in Prussian Blue, with light Creamy Brown used overall to tone down the brightness. Smidges of Staz-On teal were sparsely added to enhance the distressed look.


Do you ever look at a sticker and wonder what to do with it, or have trouble working in a square or rectangle shape into your layout? Cut it up! I wanted to use the grapevine heart design, but didn't want to add another rectangle to my layout. I used a craft knife and simply cut out the shape I wanted to use.


I added my journaling directly onto the die-cut patterned paper. Masking off the scalloped design and brads, I used teal ink for a tone on tone color. BoBunny does such a great job in creating "faux dimension" to their designs - it appears as though my lines run "under" something, when in fact they do not!

BoBunny Supplies:
Gypsy Collection: Journey Die Cut, Spice, Saffron; Combo Stickers, Flowers, Buttons and Bling, Heart & Homey Cardstock Sticker
Chunky Alphabet in Chiffon, Stamp & Store: Circle This Date, Write On, Journal
Other:
Orange Pearls: Queen & Co.
Paints: Folk Art
Inks: Colorbox Fluid Chalk Ink, Staz-on by Tsukineko
Glitter Medium: Glimmer Mist Golden Terra Cotta
Pen: Zig Memory Writer
Brown flower: Petaloo
Tools: Martha Steward and EK Success border punches

As always - thanks for coming by, and happy creating!

Sunday, November 8, 2009

Orphan Sunday


Lift the orphans of the world in prayer today please! November is Adoption Awareness Month, and Nov. 8 is designated as Orphan Sunday. For several years now I have had a link in my "Making an Impact" section for Cry of the Orphan. Today, at 4 pm Central there will be a live webcast from Nashville. I hope some of you will get a chance to tune in. Visit the link to find out more, as well as which cable channel you might tune into.

About
The 2009 Cry of the Orphan Awareness Campaign marks the fourth annual unified campaign to heighten awareness of the plight of the millions of orphans around the world. The scope of this problem is too big for any one person or organization to solve. In the midst of this crisis, organizations from around the world are joining forces to make a difference.

The Cry of the Orphan campaign is sponsored by Hope for Orphans (a ministry of FamilyLife), Show Hope, and Focus on the Family. Together, we desire to communicate that “YOU are God’s Plan for the Orphan” – each of us with our own role to play in caring for His children.

The concert will be broadcast LIVE via webcast and satellite, more info below. Also, GospelMusicChannel.com will have the full event available on their site in HD starting Friday evening, Nov 13th.

Through excellent music and the sharing of the heart of God, we hope to give a megaphone to the cries of the millions of orphans around the world. Other guests include Geoff Moore and the Children of the World Choir.

Locations with high speed internet access will be able to view the concert remotely via the web. There is no fee for the webcast or the satellite broadcast. The broadcast will be a mixture of both musical performance and the sharing of the heart of God, and it will be appropriate for all audiences.
-----------

I will never forget how a television concert in 2001 spurned me to start searching the internet for a child to adopt. I don't believe it was "Cry of the Orphan" at that time, but it was a concert during November to promotion adoption. Celine Dion was the host. I had to reach for the tissue a number of times!

One thing led to another, and eight years later I am as blessed as any mother could be with the joyful presence of Abby in our family.

Not everyone is called to adopt, but each and every one of us can make an impact! I firmly believe that. If you are interested in becoming involved, please see other links on my blog - especialy for McKallies Home of Future and Hope. Perhaps you know a family in the process of adopting. I will be honest - it is extremely expensive. Many families desire to adopt but do not because they cannot afford to. If you know of someone in the process, surprise them with a donation to their adoption fund.

Give a little piece of your heart - together we can make a difference, one child at time.

Saturday, November 7, 2009

Amazing Starry Night


I wish I could have taken a photo this fabulous, but I didn't - no doubt, my equipment is not near as good as the pro who took the photo above - but I wanted to give you a glimpse of our view looking up tonight.

It is/was a spectacular, clear evening here in southern Wisconsin. I don't think I have seen the stars so bright in a very long time. The entire family went for a late afternoon walk. Jesse had been painting the house all day, and by the time he wrapped it up it was too late to get the grill going to cook the chicken. (I don't do the grill, and pasta alfredo doesn't taste as good unless the chicken is grilled.) With dinner plans rather foiled, we decided to walk to and eat at Culver's, and burn the calories coming home. Kyle was not prepared for the temperature drop after the sun went down. Fortunately friends live not far from Culver's so we knocked on their door to borrow a sweatshirt for him to wear home.

We stopped a couple of times on the way home to just look up - even within the town limits the stars demanded to be noticed. (Didn't hurt that a couple of street lights were out either.) I could clearly make out the Big Dipper and its smaller counterpart, as well as the grouping known as 7 sisters, or Pleiades.

When we all got home we decided to blow up the air mattress and put it on the deck. There Abby and I laid down to gaze up in soft comfort - how nice of the guys to tought it on the hard surface. It was quite chilly and even the blanket on Abby could not keep her out there more than 15 minutes - but it sure was an awesome display of God's wonders.

I could clearly see shapes in the sky, the stars connecting for a divine game of dot to dot. Looking at the "star" book later in the house, I know that I spotted Aquarius, Triangulum, and Pegasus. I sure don't see wings in that one, but I did see a body, arched neck and two hing legs. Never before in my life have I been able to actually pick out constellations. It was also cool to see the two moons near Jupiter, wtih the aid of binoculars.

I hope Sunday is as clear, now that I have my constellation book out star gazing will be more exciting for the kids. We do have an action packed Sunday, however, so we star gazing may not come about. In addition to church, a baby shower, and working on a BoBunny layout, I hope to do a test portrait run at Marv's home. His new grandson from Oklahoma is visiting with his family, and it would be nice to get a three generation photo. It would also be a good test run for the Weds. morn portrait session. Kyle starts Life Group tomorrow evening as well - we're still trying to figure out logistics on that shuffle.

Have you been dazzled by the universe of stars lately? Next time you have a clear night take time to notice - you will be amazed! Speaking of amazement...just wait until you see what some of the BoBunny designers have created for some upcoming November reveals. You WILL be dazzled!

Tuesday, November 3, 2009

BoBunny Does Bittersweet


I know I sound like a broken record, but I love that BoBunny's collections can be intermixed to create gorgeous layouts. The ACOT color challenge for October was to create a layout using burnt orange and burgundy, with neutrals. I immediately knew I would be reaching for papers from the Gypsy line, and Delilah offered some beautiful papers as well.

A short while ago I shared the photo used in this layout, and asked for tips on its identification. I never just let "anything go". I have a zest to learn about such things - Google is my friend. I typed in "bushes with orange berries in Wisconsin" and found a number of links. Ultimately, I learned a lot about the three types of bittersweet found here. The plant I captured on film happens to be American Bittersweet, which is actually a rare plant these days. I actually feel honored that Jesse and I found some in the wild, and glad I took a photograph.

I was totally inspired by the beauty of the Bittersweet bushes and wanted to replicate them on paper. I love the newest trend of using pearl stickers on projects. I had just happened to pick up orange ones by Queen & Co. and the Scrapbook Superstore in Madison, in anticipation of Halloween layouts. Instead, I used them to create a "berry bush" on paper.


To journal on the nesting bracket shape from Magistical Memories, I scanned in the chipboard shape, brought it into my PS document, and set text over the top of the shape. When I had it just as I wanted, I eliminated the shape image layer, and printed my text on patterned paper. Cutting it out to fit the shape. Another tip - use the pen tool to sketch a rough outline of your shape around the outside edge. After printing you will have a guideline for cutting your shape, to ensure your type is "on straight".


I felt something was needed in the corner, but wanted to be careful not to detract from the photo and "main course" of the layout. I chose a couple of stamps by BoBunny to stamp an accent in the upper corner. I used different inks to layer the branch and leaves, and then used a fine point brown marker to doodle and outline the leaves.


I love using raffia in fall layouts, and especially in this one as it picks up on the dry grasses found in the background of the photo.


Journaling: Every year we look forward to fall. We are awestruck by God’s creation as He paints the landscape in a palette of colors. As Jesse and I hike trails along the Wisconsin River I am struck by the intense color of American Bittersweet, a rare plant we had never seen before.
I capture its rarity in print, and am sweetly reminded of the rare friendship we have with Marv and Carol Knipfer. And, although the season of fall is filled with family celebrations, in 2009 the joy is clouded by the news that Marv’s cancer has returned. We know that each moment spent with Marv is a blessing, and a bittersweet gift from God.


If you would like to learn more about our journey as we walk with Marv to his earthly end, you are welcome to stop by another blog I have resurrected to share about our Monday evenings in bible study with him.

Supplies Used:
Cardstock: Bazzill Kraft and burgundy orange peel, The Paper Co. (dark brown)
Papers: BoBunny Kitchen Spice Allspice, Gypsy Spice, Delilah You & Me
Alpha chipboard: BoBunny Chunky Chips in Chocolate and Clover
Acrylic Stamps: BoBunny “Sunburst” and “What Ya Got Cookin’”
Alphabet Stickers: American Crafts
Ribbon: Bo Bunny Orange Citrus Double Dot
Pearl Stickers: Queen & Co.
Glitter Medium: Ranger Distress Stickles
Paint: FolkArt Tangerine
Inks: Brick Red by Tsukineko, Colorbox Fluid Chalk Inks in brown and tan
Other: Thread, raffia

Monday, November 2, 2009

BoB Is In Da House!!!


16 lbs of DELICIOUS new BoBunny arrived today! I am overwhelmed with BoBunny's generousity towards their design team. We received all of the acrylic "stamp and store" sets remaining in stock. WOW! Not to mention a ton of Double Dot, embellies, ribbon, cardstock stickers.


The three new lines are fab in person...but as far as Serenade goes...holy cow! It is the most gorgeous winter line I have ever laid eyes on. I did not realize it had glitter ...oh my, I never want to run out of the stuff. Makes me wish it were snowing right now! (Seriously...I know, sick, aren't I?)

Did I mention how generous BoB was with the Double Dot cardstock? I just love this stuff. Have to show you my favorite of all colors - Kiwi - right on top there for you to see. Don't ya just want to run out and get some?


I've been saving some pictures just for this new arrival. I cannot wait to start scrapping with it. Almost makes me want to sweep my other projects off the table, but hee hee, they're for upcoming BoBunny blog posts, so I better keep moving on them! One is cute, and rather clever, if I don't say so myself...

Ya all come back now - and happy creating! Get yourself some BoBunny - btw - did I mention it is all on sale at A Cherry On Top? Go shop now!!

Sunday, November 1, 2009

Treats, Pumpkins and Cuteness


Did you enjoy your last day of October? Abby and I spent some time making little treat bags for friends. I simply cut a piece of Bo Bunny Boo Crew paper to fit inside the bag. I used "Ghoul Friends" - under the M&Ms are glimpses of cool Halloween spooks - as the recipient eats the M&Ms a ghoul friend is revealed. I thought that would be rather fun - a witch, bat, skelaton, ghost? Keep on eating to find out who you have! The back of this paper is black with the doodled skull images. Abby used a white pen to write BOO! from Abby. Very simple, very cute.

These treats were a snap to make with a box of Bagettes on hand. You can find these in most craft stores. I have had these in my stash for putting small class supplies in, such as brads. I decided they made great treat bags as well.

BTW - I so plan to scraplift this for Valentine's Day classroom treats!

More snapshots from our Halloween preparations. We spent Friday gutting pumpkins - this was the first year Abby actually cleaned her own pumpkin, with a spoon however.


Kyle gutting his pumpkin. Note Jesse's expression in the background. I love this shot because of the story it tells. You can almost hear Kyle's disgust at the slimy innards.


After seeing her brother dive into his pumpkin, Abby wanted to be brave and do the same, but not without a glove. I fashioned one out of a baggie, but still...she stared inside that pumpkin for a while, and in the end - could not bring herself to do it. Dad to the rescue!


Kyle drawing his warrior Jack face.


Abby drawing her happy Jack face.


Here are the kid's jack-o-lanterns lit up for Halloween night! I can see the kids personalities/interests in the faces they made.


Kyle ended up sleeping most of his Halloween away, with a case of flu. Abby, however, ventured out for trick-or-treating. She loved the hand-me-down unicorn/Pegasus costume from the neighbors.


A side profile shot - happily getting treats from a friend's dad.


Halloween night air was crisp and cool. Until we turned onto a north/south running street we really did not have wind, but that did our daughter in and she was ready to call it quits for the night. A bit of candy, and one nice treater was good enough to give Abby a full size Butterfinger for her sick brother, which brought a smile to his face today. Fortunately he is feeling a lot better, and he hasn't had a fever - we are past the afternoon spike period as well!

I hope you all had a fun and safe celebration. Get yourself some BoB Boo Crew and happy creating your boo night pictures!